
Reusable Input Components without Livewire, with Livewire
Photo by Killari Hotaru on Unsplash
Having reusable input components is great. Knowing how to make them is even better! Follow along to see how we can create a generic TextInput component with a fluent interface that can be reused everywhere with just a few lines of code. While it won't be a Livewire component, it can still make use of wire:model and other Livewire goodies. How is that possible? Read on to find out!
Character motivation
Before we dive in, let me explain why I won't be using Livewire (kind of - you'll see). Take a look at what I want to enable:
// example.blade.php
<div>
    {{ $this->getComponent() }}
</div>
// Example.php
class Example extends Component
{
    public $state;

    // this is default
    public function render(): View|Closure|string
    {
        return view('components.example');
    }

    // this is what I'm talking about
    public function getComponent()
    {
        return TextInput('Cool Input')
            ->required()
            ->statePath('state')
            ->disabled(fn($state) => strlen($state) > 8);
    }
}
As you can see I can render a TextInput component on the fly by just returning the instance of the TextInput class I've just created. Using a fluent API I can configure it, and it can react to its own state. So, why aren't we using Livewire components for this?
For this purpose, Livewire components have two major drawbacks:
- Every component is an island. This means that sharing the data around will get overwhelming real quick.
- You can't create a Livewire component on the fly and then render it from a PHP class. Try it out: Inside of a PHP class (a Blade or Livewire component), create a new instance of a Livewire class and try to get it to render. Trust me, I tried and failed a lot. It doesn't work.
Now that I've made my case against using Livewire components for this: let's make this, shall we?
Building the component
Let's start off with building a simple TextInput component. As mentioned, this will not be a Livewire component but a simple Blade component. Later on, we'll see how we can still make use of Livewire goodies like wire:model.
Let's make the component with php artisan make:component TextInput.
Add in a simple template:
<div>
    <label for="{{$name}}" class="block font-medium text-sm text-gray-700">{{$name}}</label>
    <input id="{{$name}}" class="border-gray-300 focus:border-indigo-500 focus:ring-indigo-500 rounded-md shadow-sm">
</div>
As you can see, it's quite simple: an input with a label grouped together in a div. For the input ID as well as the label text, I'm using a $name property that will be passed in using the view() method that's used in the rendering of the component. Here's a quick example:
public function render(): View|Closure|string
{
    return view('components.text-input', ['name' => 'Example Name']);
}
Adding a fluent interface
Now, let's focus on the php class of the component. I'd like it to enable a fluent interface so methods can be chained, just like Laravel's query builder does for example. Here's how that looks, as a reminder:
// these methods (and others) can be chained to build up the query
$model::query()
  ->where('id', '>', 10)
  ->orderBy('created_at')
A fluent interface works by returning the current class in a certain method, so the next method in the chain receives the current class again.
Let's start off with a make() method, that will leverage the class's constructor to create a class instance. In the constructor, we want to add all the essential parameters to create an instance of this class. For now, that will just be a name for the component:
class TextInput extends Component implements Htmlable
{

    protected string $name;

    public function __construct(string $name)
    {
        $this->name = $name;
    }

    public static function make(string $name) : static
    {
        // app(static::class) will use the constructor of static::class (so, this current class: 'TextInput') to create an instance of this class with whatever parameters are supplied.
        return app(static::class, ['name' => $name]);
    }

    public function render(): View|Closure|string
    {
        return view('components.text-input',
        [
            'name' => $this->getName(),
        ]);
    }

    public function toHtml()
    {
        return $this->render();
    }

    private function getName() : string
    {
        return $this->name;
    }
}
At this moment, we just pass a name into the component, and we use that $name as the label text and the ID for the input. To retrieve the name we use the private getName() method when rendering the component. You might be wondering why we don't just make the $name property public, but I feel it adds too much clutter when configuring the component. I only want the methods you're supposed to use when configuring the component to be public, nothing else.
For the Blade engine to understand how to turn this component class into html, we implement the Htmlable interface and with it, the toHtml() method. This will just call our render() method which is the same as using <x-component></x-component> in a Blade template.
To render the component on the TestPage page, we can use a getComponent() method to return the component as a whole. In there, we'll make and configure the component. Check it out:
class TestPage extends Component
{

    public function render()
    {
        return view('test-page');
    }

+   public function getComponent()
+   {
+       return TextInput::make('Test Input', $this);
+   }
}
Here's the template for the TestPage:
<!-- test-page.blade.php-->
<!-- I'm using the Breeze app layout here. -->
<x-slot name="header">
    <h2 class="font-semibold text-xl text-gray-800 leading-tight">
        {{ __('Testing Page') }}
    </h2>
</x-slot>

<div class="py-12">
    <div class="max-w-7xl mx-auto sm:px-6 lg:px-8">
        <div class="bg-white shadow-sm sm:rounded-lg">
            <div class="p-4">

                {{ $this->getComponent() }}
            </div>
        </div>
    </div>
</div>
{{ $this->getComponent() }} will use the toHtml() method in the TextInput class to turn the class instance into usable html. If we load this page, our component is displayed just like we wanted!


Making the data reactive with Livewire
As of now our TestPage has no idea what's inside the input, and it definitely can't react to it. With Livewire, we'd simply add a wire:model onto an html input and that would be it. And that's exactly what we're going to do! Let's turn the TestPage into a Livewire component first, by making it extend Livewire\Component instead of Illuminate\View\Component.
Now, we need to connect the input in the TextInput component to our TestPage Livewire component. How? Well, what if I told you the TextInput component will be rendered completely as dumb HTML and dropped into the template of the TestPage Livewire component?
So, if we were to put a wire:model in that chunk of HTML that is our Blade component... That's right, we can use wire:model inside Blade components! This will work as long as it's rendered inside of a Livewire component.
One caveat: we need to make sure our Blade component and our Livewire component agree what property gets used for the wire:model. For that, I'll add a $statePath variable on the TextInput Blade component and pass it in when we create the component:
class TestPage extends Component
{
+   // this will contain what the user entered in the TextInput component.
+   public string $state;

    public function render()
    {
        return view('livewire.test-page');
    }

    public function getComponent()
    {
        return TextInput::make('Test Input', $this)
+           ->statePath('state'); // this lets the TextInput know what to put in wire:model=""
    }
}
class TextInput extends Component implements Htmlable
{
    protected string $name;
+   protected string $statePath;

    // __construct() and make() method here, they are unchanged

+   public function statePath(string $statePath) : static
+   {
+       $this->statePath = $statePath;
+       return $this;
+   }

    public function render(): View|Closure|string
    {
        return view('components.text-input',
        [
            'name' => $this->getName(),
+           'statePath' => $this->getStatePath(),
        ]);
    }

    // toHtml() and getName() are also unchanged.

+   private function getStatePath() : string
+   {
+       return $this->statePath;
+   }
}
<!-- text-input.blade.php -->
<div>
    <label for="{{$name}}" class="block font-medium text-sm text-gray-700">{{$name}}</label>
-   <input id="{{$name}}" class="border-gray-300 focus:border-indigo-500 focus:ring-indigo-500 rounded-md shadow-sm">
+   <input id="{{$name}}" class="border-gray-300 focus:border-indigo-500 focus:ring-indigo-500 rounded-md shadow-sm" wire:model="{{$statePath}}">
</div>
I'll quickly add a debugging line in the Livewire TestPage template, to show that the wire:model works. Just add this line somewhere in your Livewire component:
<span>Wire:model property = {{$state}}</span>
To see the data binding in (almost) real-time, change the wire:model in the TextInput template to wire:model.live . Try it out by typing in the text box, the value should be printed out on the page!
Enabling and disabling the input
Now let's see how far we can take this. Usually, form inputs can be disabled on certain conditions. Let's see if we can enable or disable the TextInput blade component from our Livewire page. Let's begin with passing in a boolean variable from the Livewire page to disable/enable the Textinput:
class TextInput extends Component implements Htmlable
{
    protected string $name;
    protected string $statePath;
+   protected bool $disabled;

    // unchanged methods here...

+   public function disabled(bool $disabled) : static
+   {
+       $this->disabled = $disabled;
+       return $this;
+   }

    // more unchanged methods...

+   private function isDisabled() : bool
+   {
+       return $this->disabled;
+   }
}
We'll need to update the template as well to show the disabled state:
<div>
    <label for="{{$name}}" class="block font-medium text-sm text-gray-700">{{$name}}</label>
-   <input id="{{$name}}" class="border-gray-300 focus:border-indigo-500 focus:ring-indigo-500 rounded-md shadow-sm" wire:model="{{$statePath}}">
+   <input id="{{$name}}" class="border-gray-300 focus:border-indigo-500 focus:ring-indigo-500 rounded-md shadow-sm disabled:bg-gray-100"
+          @disabled($disabled) wire:model.live="{{$statePath}}">
</div>
If we now add a $disabled property on the Livewire page along with a toggle button, and pass it to the Textinput component, we'll see that we can toggle the component on and off:
class TestPage extends Component
{
    public string $state;
+   public bool $disabled = false;

    public function render()
    {
        return view('livewire.test-page');
    }

    public function getComponent()
    {
        return TextInput::make('Test Input', $this)
            ->statePath('state')
+           ->disabled($this->disabled);
    }

+   public function toggleDisabled()
+   {
+       $this->disabled = !$this->disabled;
+   }
}
For reference, here's what the toggle button on the Livewire page template looks like:
    <button class="px-4 py-2 bg-blue-700 rounded-md font-semibold text-white hover:bg-blue-800" wire:click="toggleDisabled">
        Toggle
    </button>
By toggling the $disabled property, the Livewire component will get re-rendered. During the re-rendering, the getComponent() method will be called again, so the disabled() method will now receive the updated value of the $disabled property of the Livewire page. The Blade component itself is not reactive, but it feels reactive because the Livewire page will re-render the component whenever a public property of the Livewire page is updated.
In the same way we can pass a Closure to the $disabled property, and toggle the disabled state based on its input. Check it out:
class TextInput extends Component implements Htmlable
{
    protected string $name;
+   protected \Livewire\Component $livewire;
    protected string $statePath;
-   protected bool $disabled;
+   protected bool|Closure $disabled;

-   public function __construct(string $name)
+   public function __construct(string $name, \Livewire\Component $livewire)
    {
        $this->name = $name;
+       $this->livewire = $livewire;
    }

-   public static function make(string $name) : static
+   public static function make(string $name, \Livewire\Component $livewire) : static
    {
-       return app(static::class, ['name' => $name]);
+       return app(static::class, ['name' => $name, 'livewire' => $livewire]);
    }

    // some unchanged methods here...

-   public function disabled(bool $disabled) : static
+   public function disabled(bool|Closure $disabled) : static
    {
        $this->disabled = $disabled;
        return $this;
    }

    // more unchanged methods here...

    private function isDisabled() : bool
    {
-       return $this->disabled;
+       return $this->evaluate($this->disabled);
    }

+   private function evaluate($value, array $parameters = [])
+   {
+       $state = data_get($this->livewire, $this->getStatePath());
+       if ($value instanceof Closure) {
+           return app()->call($value, array_merge($parameters, ['state' => $state]));
+       }

+       return $value;
+   }
}
The main update here is the evaluate() method. This enables us to pass a Closure into the disabled() method, which we can then evaluate at runtime. To do that we need to get the value of the Livewire property that's connected to our input. We can do that by passing our Livewire parent into our constructor as $livewire, and then using data_get($this->livewire, 'state').
This retrieves the $state variable on the Livewire component. If our $disabled property is a Closure, we'll call it using app()->call() and make the $state variable accessible, as well as the $parameters we defined as a function parameter. That way if the Closure uses a variable called $state, the contents of the $state variable we defined on the Livewire page will be passed in. Since we used wire:model to connect that variable to our input, we'll receive the input value. Neat! This enables us to disable our input based on the input value, for example if it exceeds 8 characters:
// TestPage.php
public function getComponent()
{
    return TextInput::make('Test Input', $this)
        ->statePath('state')
        ->disabled(fn($state) => strlen($state) > 8);
}
Displaying errors
But wait, there's more!™️
Livewire has more tricks than just wire:model! Let me show you that validation also works great here. I'll quickly add a validation rule on $state, like this:
+   #[Validate('required|max:8')]
    public string $state;
If we were to type a string of 9 characters in the input field, we wouldn't see anything. I assure you the error is being thrown, though! We just need to show it on the Textinput component:
<!-- text-input.blade.php -->
<div>
    <label for="{{$name}}" class="block font-medium text-sm text-gray-700">{{$name}}</label>
    <input id="{{$name}}" class="border-gray-300 focus:border-indigo-500 focus:ring-indigo-500 rounded-md shadow-sm" wire:model="{{$statePath}}">
-   <input id="{{$name}}" class="border-gray-300 focus:border-indigo-500 focus:ring-indigo-500 rounded-md shadow-sm disabled:bg-gray-100"
-         @disabled($disabled) wire:model.live="{{$statePath}}">
+   <input id="{{$name}}" class="border-gray-300 focus:border-indigo-500 focus:ring-indigo-500 rounded-md shadow-sm disabled:bg-gray-100"
+         @disabled($disabled) @error($statePath) invalid @enderror wire:model.live="{{$statePath}}">
+   @error($statePath)
+     <span class="text-red-700 text-sm>{{ $message }}</span>
+   @enderror
</div>
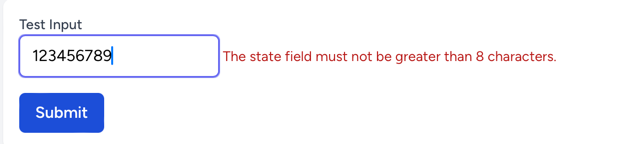
As you can see, the @error() Blade directive works great together with Livewire validation. The logic is the same as for the reactivity: our component is just a building block used in a Livewire component, so it 'inherits' the Livewire goodness form its parent.
And there we have it: a fully reusable TextInput component! Thanks to the fluent interface it's easy to use and feels native to Laravel. On top of that, it integrates perfectly into Livewire which makes reactivity a breeze. Thanks for reading and I'll see you in the next one!
Other articles you might like
 June 13th 2026
Building a Production MCP Server in Laravel
Spec version notice: This article targets MCP specification version 2025-11-25. The protocol has sh...
 May 30th 2026
Evals in Laravel: How to Prove Your AI Output Is Actually Good
You shipped the ticket classifier last quarter. It works. The tests are green and they've stayed gre...
 April 28th 2026
Event sourcing with a little help from AI
Event sourcing in Laravel gives you a complete history of your domain, but the hardest part isn't wr...


The Laravel portal for problem solving, knowledge sharing and community building.